
RANGE & OVEN
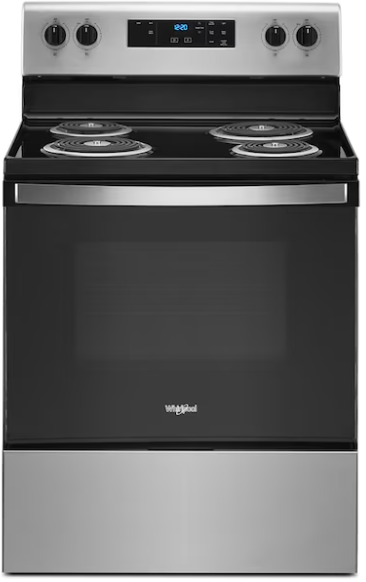
Whirlpool Electric Range
Operating guide for the Whirlpool 30-in freestanding electric range with coil element cooktop and 4.8 cu ft oven.
01
Cooktop burners
The cooktop has four electric coil elements. The two front burners are larger and higher wattage; the two rear burners are smaller. Each element plugs into a receptacle in the cooktop and sits above a chrome drip pan that catches spills.
Using the burners
- Place your cookware on the desired burner element.
- Turn the corresponding knob to your desired heat level — the coil will begin to glow orange-red as it heats.
- Adjust as needed during cooking.
- Turn the knob fully back to Off when finished.
Heat after use
Coil elements retain heat for several minutes after being turned off. The coil may no longer glow but can still cause burns — treat any recently used element as hot until it has had time to cool. Do not place hands, food packaging, or plastic items on or near the elements after cooking.
Cookware
Flat-bottomed pots and pans make the best contact with the coil and heat most evenly. Warped or rounded-bottom cookware will wobble on the element and heat unevenly. Heavy cast iron and stainless steel both work well.
02
Baking
- Press Bake on the control panel.
- Use the number pad or arrow keys to enter your desired temperature.
- Press Start. The oven will begin preheating.
- A tone will sound and the display will confirm when the set temperature is reached.
- Place food in the oven and set a timer as needed.
- Press Cancel or Off when cooking is complete.
Preheat time
Allow 15 to 20 minutes for the oven to fully preheat. Placing food in before the oven has reached temperature will affect baking results, particularly for items that rely on precise heat — bread, pastry, and cakes especially.
Rack position
The middle rack position is best for most baking. Use the lower rack for items that need a well-browned bottom crust, or the upper rack to brown the top of a dish near the end of cooking.
Opening the door
Each time the oven door opens, the temperature drops roughly 25°F and recovery takes a few minutes. Open the door only when necessary to check doneness or rotate food.
03
Broiling
Broiling uses the upper heating element for intense, direct heat from above. It is best for finishing dishes, browning a cheese topping, or searing thin cuts of meat or fish.
- Move the oven rack to a position 4 to 6 inches below the broiler element. Use a lower position for thicker cuts that need more time before browning.
- Press Broil on the control panel.
- Select Hi for most broiling, or Lo for more gradual browning of thicker items.
- Press Start.
- Watch food closely — browning under a broiler can happen in minutes.
- Press Cancel when done and remove food promptly.
Always use oven mitts when working near the broiler element. The element and surrounding oven surfaces become extremely hot.
04
Oven racks and storage drawer
Adjusting rack position
Always reposition racks when the oven is cool. To remove a rack, pull it straight out to its stop position, then tilt the front edge upward to lift it free of the rack guides. Reverse the steps to reinstall.
Storage drawer
The shallow drawer beneath the oven is for storing bakeware, sheet pans, and oven-safe cookware. It is not designed for cooking. Avoid storing flammable materials such as plastic bags or paper in this drawer, as the oven floor above it can become warm during use.
05
Self-clean cycle
This range includes a self-clean function. Before starting a self-clean cycle:
- Remove both oven racks — high heat or steam can discolor the rack finish.
- Remove any large food debris or foil from the oven floor.
- Ensure the kitchen is well ventilated — open a window or run the exhaust fan.
Running the cycle
Press Self Clean on the control panel, select the cycle duration if prompted, and press Start. The door will lock automatically and will not open until the oven has cooled after the cycle ends — this typically takes 30 to 60 minutes after the cycle completes.
Do not attempt to force the door open while it is locked. The display or an indicator light will confirm when the door is safe to open.
After the cycle
Once the oven has cooled and the door unlocks, wipe any ash or loosened residue from the oven interior with a damp cloth. Reinstall the racks.
06
Cooktop care
Coil elements
Wipe cooled elements with a slightly damp cloth to remove surface residue. Do not submerge elements in water or put them in the dishwasher — moisture inside the element can damage it. For stubborn buildup, a paste of baking soda and water applied with a soft cloth works well. Allow the element to dry completely before using.
Drip pans
The chrome drip pans beneath each element catch spills during cooking. To clean them, lift the front edge of the coil element slightly and pull it free of its receptacle, then lift out the drip pan. Wash drip pans with warm soapy water, or soak them for stubborn grease. Rinse and dry before replacing. Do not use abrasive pads — they will scratch the chrome finish and make future cleaning harder.
Cooktop surface
Wipe the cooktop surface around the elements with a damp sponge after use. For baked-on spills, a mild all-purpose cleaner and a non-scratch pad work well. Avoid letting grease or food residue build up around the element receptacles.
What not to place on the cooktop
Do not use the cooktop as a cutting board, prep surface, or storage area — even when off. Keep plastic, paper, and non-cookware items away from the elements at all times.
07
Troubleshooting
Burner does not heat
Confirm the knob is turned away from the off position. Check that the coil element is fully seated in its receptacle — press down on the element gently to ensure it is plugged in. If one burner fails while others work, the element itself may need replacement; please let us know.
Oven does not heat or displays an error
Press Cancel to clear the display, then try again. If an error code appears, note it and contact us — we can reference the manual for the specific code.
Food is browning too quickly on top
Move the rack one position lower. If using a convection setting, consider switching to standard Bake, which uses less direct heat.
Food is undercooked or browning too slowly
Confirm the oven was fully preheated before food went in. Move the rack one position higher, or add a few minutes to the cooking time.
Oven door will not open after self-clean
The door locks during and after the self-clean cycle and releases only once the oven has cooled. Allow 30 to 60 minutes after the cycle ends before the door will unlock. Do not force it.
Hot Surface light stays on
This is normal — the cooktop surface remains warm for several minutes after the burner is turned off. The light will go out once the surface has cooled to a safe temperature.
Still having trouble?
Please contact us through the booking platform. We're happy to help.